Learn How to Safely Clean Up After Construction in Your Southern California Home
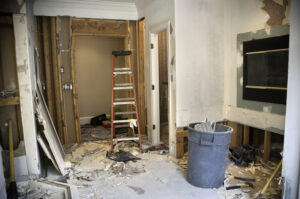
So, you’ve just finished a long-overdue yet arduous renovation job. So, what’s next? Well, cleaning up after a construction project is generally the last stage in any home improvement endeavor. Construction dust cleanup begins the moment all the equipment are put away, whether you did the remodeling yourself or worked with professional contractors in your house. Even though the contractors you worked with did some cleaning up, a full cleanup is still required to provide a clean and safe atmosphere.
We’ll go over several dust-removal gear you should have on hand, as well as why post-construction cleanup should be a top priority if you want to limit the danger of airborne irritants. If you are ready to get a quote for professional cleaning services, contact Kimberly's Kleaning Service at 702-263-0468.
Health consequences of construction dust
If you’ve been sanding or cutting wood, tile, or drywall as part of your restoration project, extended exposure to construction dust that hasn’t been fully cleared can be hazardous to your health. Exposure to these irritants on a regular basis might induce respiratory issues and allergy symptoms.
Whether you’re hiring one or many home service companies, discuss what you may anticipate from them in terms of real work and cleaning. A respectable contractor will gladly describe the task and how they plan to clean up thoroughly (including construction dust) once the project is finished.
Cleaning up after a renovation
When dealing with the first cleanup, the same hazards that come with long-term exposure to construction dust are present. Consider hiring specialists to assist remove construction dust from your living areas if you have current or previous respiratory health issues or are allergic to dust.
To protect your eyes and lungs from particle pollution during post-construction cleanup, you’ll need to wear protective gear. We highly advise that you use personal protection equipment (PPE), such as:
- Goggles with a protective shield over your eyes
- N95 mask
- If there’s a danger you’ll come into contact with liquid chemicals, use work gloves or rubber gloves
Depending on the scope of your remodeling, you may want to consider renting some equipment to help with cleanup. Wet-dry vacuums, for example, are commonly used by professionals to manage heavier debris and construction dust.
How to get rid of renovation dust in a safe way
Allow plenty of time to perform the steps listed below, and consider enlisting some assistance.
You’ll need the following items to clean up after a renovation:
- A broom or a duster with a long handle
- A vacuum cleaner that may be used both wet and dry
- Cloth made of microfiber
- Sheets of plastic
It’s time to get started now that you’ve got everything you need
Any portions of your home that were not touched by the remodeling should be sealed off. If the building site is still a mess, consider covering entrances with plastic to prevent dust from traveling to other areas of your home. Cover any furniture with plastic or a bedsheet if it’s close by. To protect your HVAC system from dust, you should cover any vents in the region momentarily.
Using a broom or a long-handled duster, dust high surfaces. Use your microfiber cloth to clean areas that are within easy reach. This might be a lengthy procedure. Dust the ceiling, windowsills, window and door trim, and any other hard surfaces that dust may cling to, starting at the ceiling and working your way down to the floor.
The idea here is to shift dust from hard-to-reach areas to lower, easier-to-vacuum surfaces. Because fine dust particles might take a long time to settle, wait approximately an hour after you’ve broomed and dusted the higher regions before cleaning the bottom portion and floor. You’ll also save time and effort by not having to dust twice. If you clean the lower parts first, you’ll have to clean the lower regions again after the dust accumulates in the upper locations.
To remove dust fast and effectively, use a wet-dry vacuum. It may require more than one pass to remove a significant amount of dust. Keep an eye out for nails, splinters, drywall shards, and other debris that the construction workers may have overlooked when cleaning.
Touch-up in a week
A week later, more airborne construction dust may have settled, necessitating a second cleaning. You’ll need some of the same cleaning supplies as before, as well as a reliable mop for this job. Consider using the same personal protective equipment to avoid contact with leftover construction dust, even if it isn’t required.
Dust the area as you would usually. At this stage, you shouldn’t need to cover any neighboring doors or vents with plastic. Read on for some helpful hints on how to dust effectively. On harder-to-reach areas like bookshelves, use a microfiber cloth to collect the finer dust. To clean the afflicted flooring, use a mop. Make sure you’re using the right cleaning for your flooring.
Save time and money by hiring a professional cleaning service
A remodeling project may breathe new life into your house by giving it a new look and feel. However, if you keep your new and better house tidy, you’ll love it much more. At Kimberly's Kleaning Service we can safely and comprehensively clean up after construction is finished. Call us at 702-263-0468 to learn more.